A parked vehicle in summer sun gets far hotter than any house, and the same vehicle in winter gets far colder. Vinyl plank moves with that, and the whole question of how to lay it in an RV comes down to whether you let it.
For interlocking plank, floating is the standard method and usually the right one. Glue it solid and the movement has nowhere to go, so seams split or the field heaves. Float it, leave the plank room at the edges, and the same movement is absorbed invisibly.
Check what is underneath before you buy anything
Flooring is the layer that hides everything, which is exactly why you inspect before you cover it up rather than after.
Walk the whole floor slowly and deliberately, in bare feet if you can. Sags and soft spots mean rot in the subfloor. Pay attention around the door, under windows, at the corners of slide-outs and anywhere a wall meets the floor, because those are where water gets in.
A soft floor is not a flooring job. It is a structural repair with a flooring job on the end of it, and laying new plank over soft ply buys you a nice-looking floor that fails from underneath in a season. If you find soft spots, stop and read where to start on a camper renovation first.
A sound plywood subfloor also does something for the finished floor: it stops the flex that a moving vehicle puts through everything, which is what opens seams over time.
Floating, and what that actually requires
Floating means the floor is not fixed to the subfloor at all. It is held in place by its own weight and by the trim around the edges, and it moves as a single sheet.
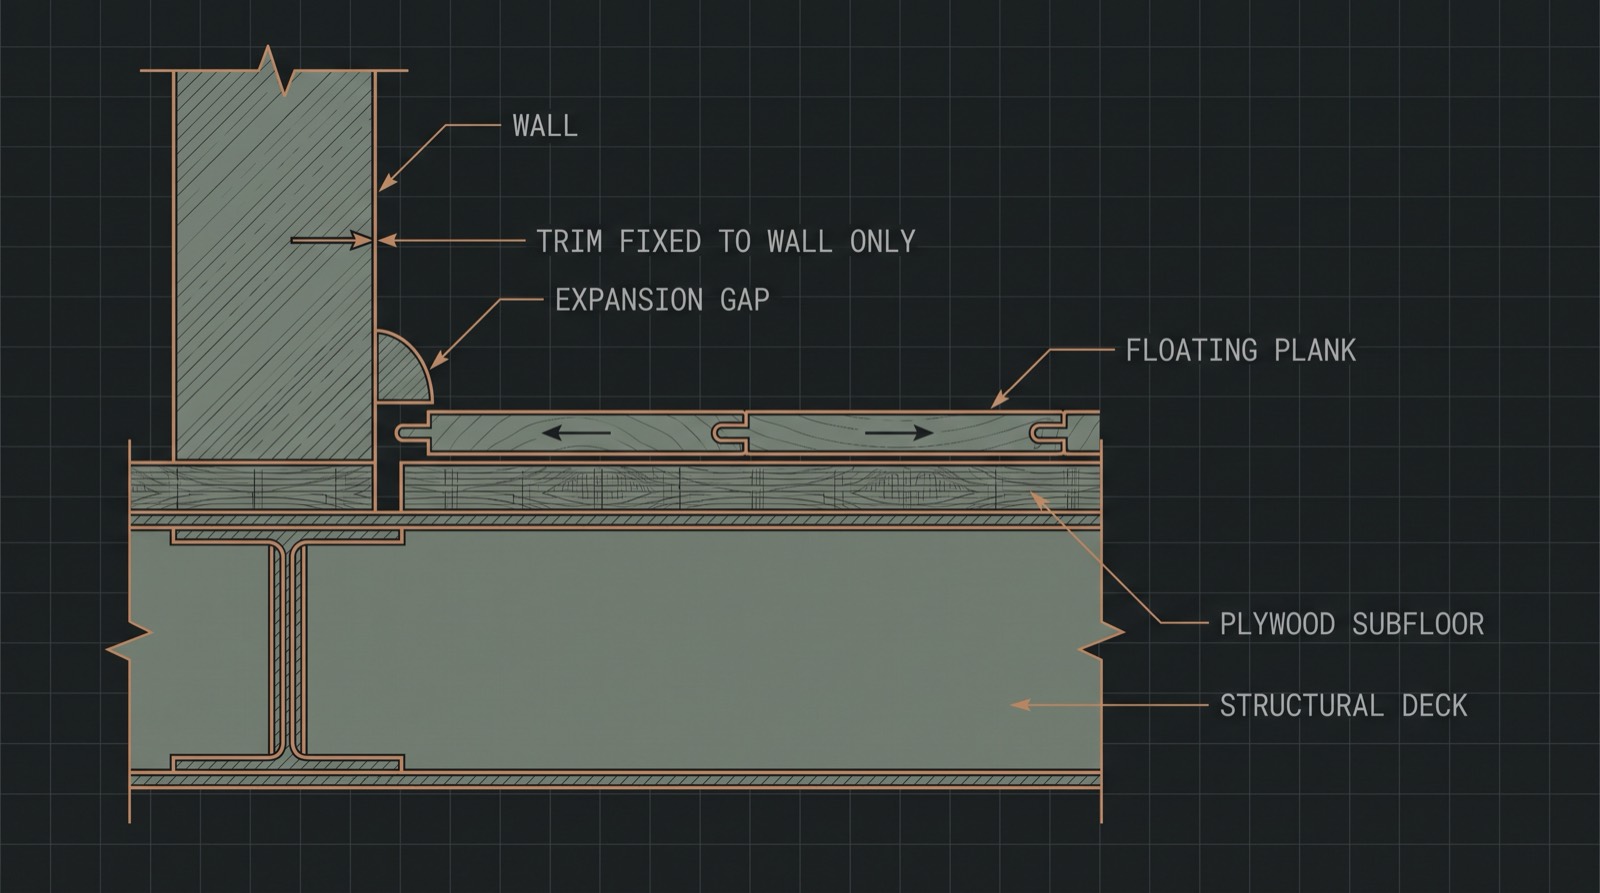
That only works if you give it room. Leave an expansion gap of about 6 mm (1/4 in) around the entire perimeter, including around any fixed obstruction, and cover it with trim or quarter-round that is fixed to the wall rather than to the floor. Trim screwed down through the plank pins it and undoes the whole point.
The gap is the step people skip because it looks untidy before the trim goes on. It is also the step whose absence causes the buckling they will be asking about in a year.
The exception: under a slide-out
If a slide-out rolls across the floor, a floating plank can be pushed or torn by the roller as the room comes in and out.
The usual answer is not to glue the whole floor, it is to glue only the strip that lives under the slide path and float the rest. Some people use a padded vinyl there instead of plank. Either way the principle holds: fix the bit that gets mechanically attacked, and let everything else move.
What it weighs
Flooring is heavy and it is easy to forget it counts. Plank runs roughly 5 to 7 kg per square metre (about 1 to 1.5 lb per square foot) depending on thickness, and if you leave the original floor down and lay on top, you are carrying both.
In a small van that is a nuisance. In a motorhome near its limit it is real. Your cargo capacity is the gross vehicle weight rating minus the unloaded weight, and it is finite: every kilogram of flooring is a kilogram of water or gear you can no longer carry. Pulling the old covering up rather than laying over it is worth the extra afternoon.
Practical points that are specific to a vehicle
Acclimatise the plank inside the RV, not in your garage, for a day or two before laying. It will settle at something nearer the temperature it has to live at.
Lay it lengthwise, front to back. Long runs look better in a narrow space and you get fewer end joints in the traffic lane.
Do not run it under the fridge or fixed furniture unless you are happy never to move them. Floating floors want to be one continuous field; pinning them under a heavy fixed appliance creates a hard point the rest of the floor pulls against.
Keep a few spare planks. Colours are discontinued constantly and a single damaged plank in a floating floor is genuinely replaceable, which is one of the method’s quiet advantages.
If you are replacing the subfloor too
At that point you are cutting sheet goods, and the sheet you can buy depends on where you are. The cut list calculator will nest your subfloor pieces and tell you the sheet count on American, British, European and Australian stock, which differ by enough to change the answer.