The carcasses in most RVs are fine. They are screwed to the wall, they are not carrying much, and they rarely fail. What fails is the doors: the film peels at a corner, a hinge tears out of soft core, or somebody sat on an open one.
Replacing just the doors is the cheapest meaningful change you can make to an interior, and it is one of the few RV jobs where the hard part is measuring rather than building.
Do you have overlay or inset doors?
This is the first question and it determines everything else.
An inset door sits inside the opening, flush with the front of the cabinet. An overlay door sits in front of the opening and covers some or all of the frame around it. Overlay is far more common in RVs because it hides the inconsistencies in a lightweight carcass.
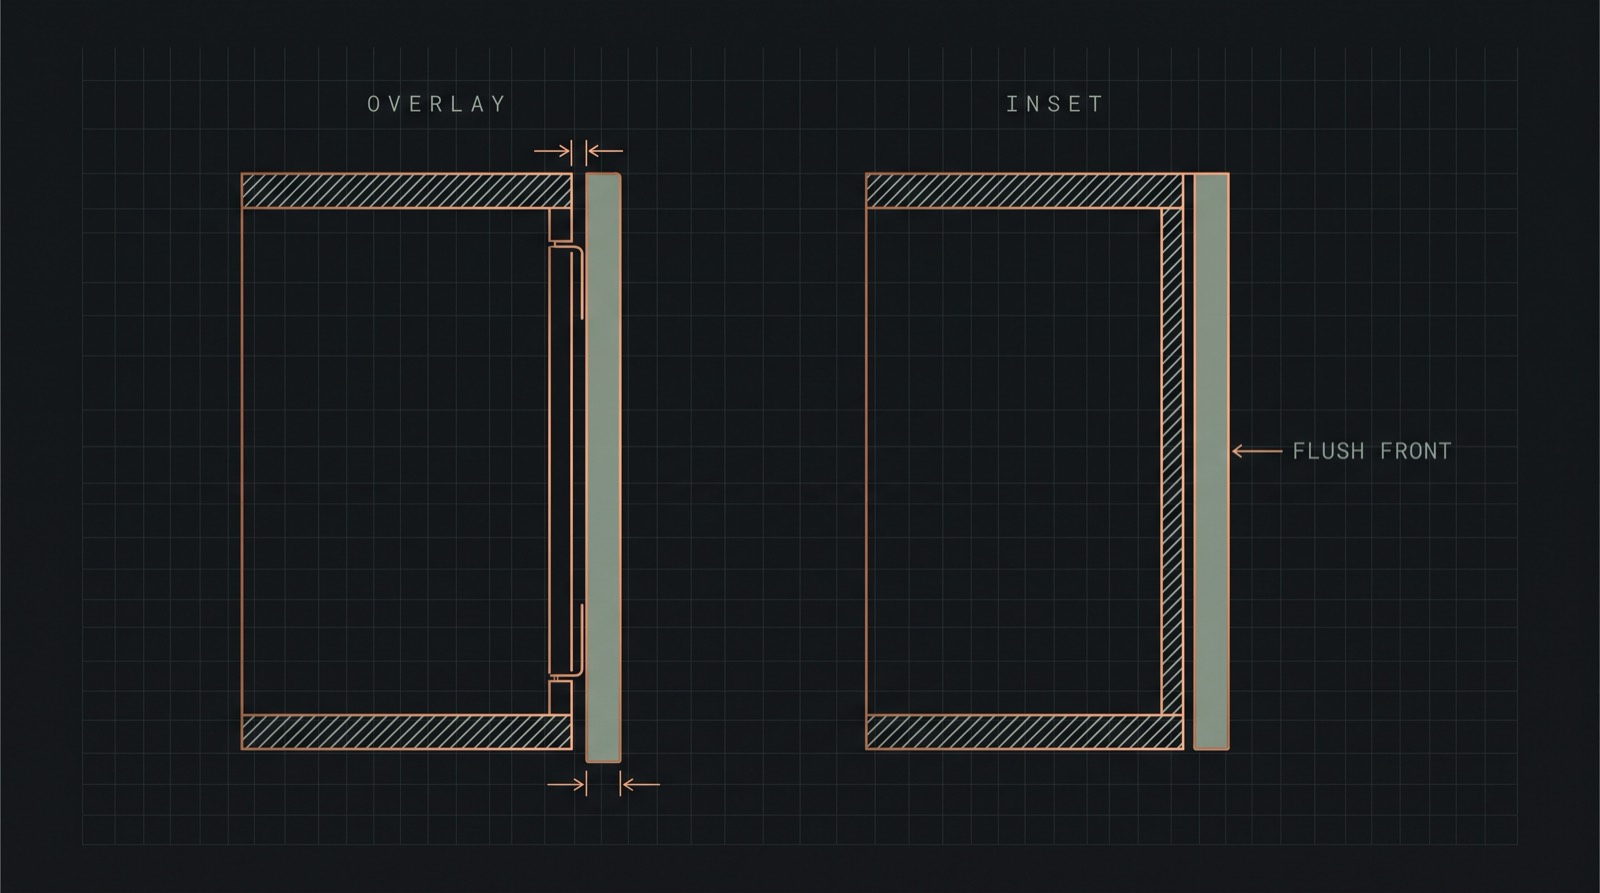
To find your overlay: close the door, mark the frame in pencil where the hinge side of the door reaches, then open it and measure from the inside edge of the opening to your mark. A flush door gives you zero, which means inset.
Measure every opening. Do not measure one and assume. RV cabinets are built to a price and openings that look identical are frequently a few millimetres apart.
Which hinges
Almost certainly 35 mm cup concealed hinges, sometimes called European or Euro hinges. The cup is 35 mm across (about 1 3/8 in) and sits in a round recess bored into the back of the door, with a standard screw spacing of 45 mm.
The alternative you may find on older or cheaper units is a surface-mount hinge screwed to the face. Those are easier to fit and uglier, and they are usually what somebody reached for after a concealed hinge pulled out.
Boring the cup needs a 35 mm Forstner bit and a drill press or a jig. Freehand is possible and rarely square. If you are ordering doors, order them bored, and give the supplier your overlay figure so they set the boring distance from the edge correctly for your hinge.
That distance matters and it varies by hinge and by door thickness. Take it from the hinge manufacturer’s own specification rather than a general rule, because getting it wrong by two millimetres puts every door out of alignment in a way that adjustment cannot fully recover.
Order them or make them
Ordering is usually right if you want a painted or laminated finish and consistent sizes. Making them is right if your openings are irregular, if you want a material nobody sells ready-made, or if you are already cutting sheet goods for something else.
If you are making them, the thing to get right for a vehicle is weight. A door in 18 mm hardwood ply is close to twice the mass of the 6 mm film-faced panel it replaces, and a galley might have eight of them. That weight sits high in the vehicle, which is the worst place for it, and it counts against your cargo capacity like anything else you load.
Thinner material with a solid edge banding, or a light frame-and-panel door, gets you most of the durability at a fraction of the mass.
Our cut list calculator will tell you how many sheets a set of fronts takes, and will show you whether the sizes you have planned actually nest onto the sheet stock sold where you are buying. That last part catches people out: a door layout drawn around a 4 × 8 sheet does not necessarily fit Australian or European stock.
Hanging and aligning
Concealed hinges adjust in three directions, usually with two screws: one moves the door side to side, one in and out, and the mounting plate position handles height. Fit every door loosely first, then adjust across the whole run, because aligning one door perfectly to a wonky neighbour just moves the problem along.
Work to consistent gaps rather than to the cabinet. In a vehicle nothing is truly square, and the eye reads an even 3 mm gap as correct even when the carcass behind it is not.
While the doors are off
It is the only easy access you will ever get to the inside of those cabinets. Fit the shelf pins you meant to, run any cable you were going to have to fish later, and check the carcass fixings into the wall, because a cabinet that has been shaken down a road for a decade is often looser than it looks.
If the doors came off because you are painting rather than replacing, the sequence and the primer choice are covered separately in painting RV cabinets.